Sexy Halloween Witch Tutorial
September 18th 2011
By: KMLDesignz
Supplies Needed:
Any version of PSP should work.
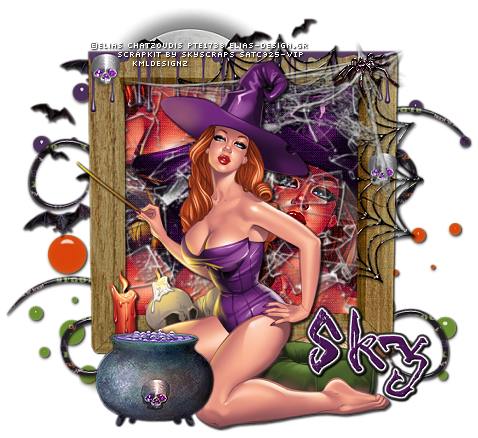
Tube of choice, I am using the artwork of Elias Chatzoudis
www.elias-design.gr
which is PTU and you need a license to use it
You can get those both of those @ PTE here
Scrap kit of choice, I am using a PTU kit by Skyscraps @ SATC,
http://scraps-and-the-city.blogspot.com/
you can purchase that here.
Eye Candy 4000 Gradient Glow- Optional
Font of choice, I am using Spider Bite, you can download @ Dafont.com
Let’s Get Started
Open up your supplies and minimize for now. Open a new image 700*500, we will resize or crop out later if needed.
On your new image, open up your choice of a frame, I am using frame 11 from the kit I am using
C/P as new layer on your image, resize this one @ 70% smartsize once and then again @ 85% smartsize and sharpen twice, add a drop shadow, V&H-1 Opacity-100 Blur-2 Color-BLK.
Open your paper of choice from your kit, I am using paper 6 from mine, C/P as new layer and resize some and make sure to sharpen at least twice, erase any that hangs over the frame and bring below the frame layer.
Now on to work with your tube, make sure you have a tube with a nice close up or don’t resize too much.
Take your tube, C/P as new layer, bring below the frame layer, ABOVE the paper layer, adjust it so it looks nicely in the frame, like part of the face on one side, and erase anything that hangs out, Then do the same for another part of the tube layer, I did the boob area. On the close up the face layer, change the layer to hardlight, and do the same for the other one.
Then I took the shattered glass from my kit, C/P as new layer and resize once @ 85% smartsize, and sharpened once, and placed this above the close up of the tubes and erased any that hung over the frame, add the same drop shadow as before. If your using this kit, its element 38.
Then take element 39 from the kit and C/P as new layer, mirror once. Resize this @ 85% smartsize 5 times, and sharpen twice, add same drop shadow as before, I placed this on the top of the frame some.
Now take your full tube, C/P as new layer, resize it down some so it fits nicely on your tag, above all layers, sharpen at least twice and add same drop shadow as before.
Let’s Decorate The Taggie:
Open up SkyScraps-HH-E54 or an element in your kit, C/P as new layer, resize this @ 85% smartsize 11 times and sharpen 5 times, add same drop shadow as before, place this in the top right of the tag above all layers, and make it as its sitting on the cob web.
Open up SkyScraps-HH-E18 or an element from your kit, C/P as new layer, resize this @ 85% smartsize 3 times and sharpen 3 times and add same drop shadow as before, I made this peak behind all layers on the left of the tag some. Use my sample as guide or go your own way.
Open up SkyScraps-HH-E34, or any splat like elements you have, C/P as new layer, resize @ 60% smartsize once and sharpen once, same drop shadow as before, I did this for the other 2 colors I had in the kit and arranged them behind all layers and made them peak out some.
Open up SkyScraps-HH-d1 or a swirl like element you have, C/P as new layer, resize this one @ 70% smartsize once and then 80% smartsize, sharpen twice and add same drop shadow as before, I duplicated this once and mirrored it then flipped so it’s on top of the tag as well, behind all layers.
Open up SkyScraps-HH-E16 or another element you have, C/P as new layer, resize 5 times @ 80% smartsize and sharpen 5 times as well, same drop shadow as before, place this nicely above all layers and have it sit nicely with the tube or depending which tube your using, you might skip this step since it goes with the Witch tube I am using.
Open your font of choice, add your name and any copyright that belongs and save as a png or jpg and your done :)
Thank you for trying my new tutorial, hope you had fun!


0 comments:
Post a Comment