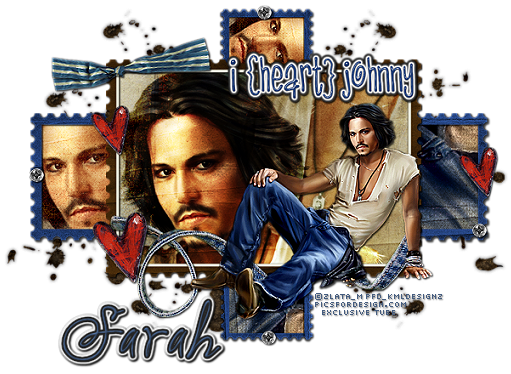
I Heart Johnny Depp Tutorial
September 15th 2011
By KMLDesignz
Supplies Needed
Tube of choice, I am using PTU tube by Zlata_M @ PFD
http://picsfordesign.com/en/
You need a license to use it and can purchase that here.
Scrap kit of choice, I am using PTU scrap kit I [heart] Johnny By Designs By Sarah
http://www.pmtws-designsbysarah.blogspot.com/
Font of choice, I am using is Abuelito
Eye Candy 4000 Gradient Glow (Optional)
Let’s get started.
Open up your supplies and minimize them for now, open up a new image 700*500, we will resize/crop out later if needed.
Open up sb_pmt_i-heart-johnny_frame 2, C/P as new layer, resize this @ 65% smartsize, once and sharpen once.
Using your magic wand, click inside your frame, expand by 3.
Open up sb_pmt_i-heart-johnny_pp3, C/P as new layer, resize this 4 times @ 85% smartsize and sharpen 3 times. Invert and delete the excess that hangs out of the frame layer. Bring this below your frame layer, add drop shadow to your frame layer using these settings, V&-1 Opacity-100 Blur-2 Color-BLK.
Open up your tube of choice you are using. C/P as new layer.
I took the close up the of the face for my tube and put it above the paper layer but below the frame, then, click inside your frame again, invert and delete, I did the same thing but with a different part of the tube, the chest of mine for this. Do this for your tube you picked. Once you have those set, I changed my layer of the face close up to overlay, duplicate once and then play with the opacity to the bottom one. I did the same to the other part of the tube, but this time changed it to softlight. Play with the settings for which one you might like better. C/P your tube again and resize it nicely to fit nice on the tag, sharpen a few times and add same drop shadow as before, I placed mine nicely on top of the frame layer, but just enough so it doesn’t cover the background we made with the parts of the tube we just did.
Time To Decorate Your Taggie!!
Open up sb_pmt_i-heart-johnny_word art 2, C/P as new layer, resize twice @ 70% smartsize, sharpen once, place on top right of the tag above the frame layer, I added 2 gradient glows to mine then the sharpened again and added the same drop shadow as before, make sure the gradient glow compliments the tube and or Taggie colors your using.
Open up sb_pmt_i-heart-johnny_ribbon 5, C/P as new layer, resize once @ 70% smartsize and then once @ 85% smartsize and sharpen twice, same shadow as before, place below the tube layer, but above the frame.
Open up sb_pmt_i-heart-johnny_heart 1, C/P as new layer, resize 4 times @ 70% smartsize, and sharpen 3 times, same shadow as before, place this in bottom left of tag, above all layers, use my sample as a guide or place where you think it looks best for your taggie.
Open up sb_pmt_i-heart-johnny_frame 1, C/P as new layer, resize once @ 85% smartsize, sharpen twice, bring this below all layers and have it peek out some. Close all other layers, click inside each of the frame we just pasted, expand by 5 and open your tube back up and place different pieces of the tube in each square on the frame, Open up another paper of choice, I used sb_pmt_i-heart-johnny_pp2 and sharpen once, then invert and delete the excess that hangs, bring this below your tube layers in this frame. Merge the tube pieces we just did together, then change the blend mode to overlay, add same drop shadow to the frame layer. Make sure the tube layer is above the paper to get the effect. Duplicate your frame layer once you merge those layers together, rotate 90 degrees to the right, and resize twice @ 85% smartsize sharpen twice, and adjust it so it peaks out some like my sample. Add drop shadow to this layer and the other one.
Open up sb_pmt_i-heart-johnny_mud splat 2, C/P as new layer, bring below all layers, leave as is.
The heart layer we did, I duplicated that twice and resize it @ 70% smartsize and sharpened, then placed on the tag as my sample or place were you like or skip this step, its up to you.
Open up sb_pmt_i-heart-johnny_screw, C/P as new layer, resize 6 times @ 70% smartsize and sharpen 3 times, same shadow as before, I duplicated mine a few times and placed around the tag some, use my sample as guide or place as you wish.
Open up sb_pmt_i-heart-johnny_ribbon 2, C/P as new layer, resize 3 times @ 70% smartsize, rotate 10 degrees to the left sharpen 3 times, duplicate and then rotate 10 degrees to the right, sharpen, place in top left of the Taggie, same shadow as before to both layers.
Open up font of choice, add your name and any copyright info that belongs to the tag and save as a png or jpg and you are done with the tutorial, I hope you enjoyed trying my new tutorial!


1 comments:
UM! WOW!!!!!!! nicely done!!!! :) I love this tag!!!! thank you so much for using my kit!
Post a Comment