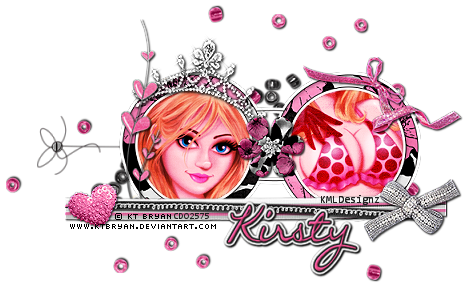
Glitz & Glam Scraps Tutorial
September 10th 2011
By KMLDesignz
Supplies needed
Tube of choice, I am using PTU tube by KT Bryan
www.KTBryan.deviantart.com
You need a license to use it and you can purchase that at CDO here
Scrap kit of choice, I am using PTU kit GlamourandGlitz by Kirsty's Scraps
http://kirstysscrapsformemories.blogspot.com/
At SATC, you can purchase here
Eye Candy 4000 gradient Glow-Optional
Font of choice, I am using Callie Hand
Let's get started
Open up your tube and supplies, minimize for now.
Open up a new image 700*500, we will resize or crop down later.
Open up your scrap kit folder. Depending which your using, file names will be different.
Open up KISM-GlamourAndGlitz-Frame4, c/p as new layer, I resized twice @ 80% smartsize,
then I rotated 90 degrees to the right and then mirrored, sharpen twice.
Now bring up your tube, best results for this is to use a tube that can be used for close up shots.
C/P your tube as a new layer, resize once @ 80% smartsize and crop out a section of the tube in one
of the frames, sharpen once and erase any that hangs over the frame, bring below frame layer.
Repeat this step for the other frame but with a different part, most likely the face of the tube.
Now depending which tube your using, I added a paper as well to fill in any gaps the tube didn't
Click inside your frame, both of them and expand by 3
Open up KISM-GlamourAndGlitz-Paper19, c/p as new layer, resize this 4 times @ 80% smartsize
and sharpen at least 3 times to make it pop some. invert and delete the access that hangs, then
click invert again and then deselect you frames. Add a drop shadow to your frame layer
V&H-1 Opacity-100 Color-BLK Blur-2.00
Now for my tube layers, I changed the blend mode to them, for the face one I changed it to hardlight
For the other, the boobs of the tube for mine, I changed to softlight, then duplicated and changed
that one to overlay, make sure the overlay one is above the softlight layer one.
To have this effect look like mine, your paper layer must below the tube layers.
Time to decorate the taggie!
Open up KISM-GlamourAndGlitz-Flower2, c/p as new layer, resize this 6 times @ 80% smartsize,
sharpen at least 4 times so it pops some, add same drop shadow as before, I placed this in the middle
of the frame so it looks hooks to the frame.
Open up KISM-GlamourAndGlitz-Leaves3, c/p as new layer, resize this 5 times @ 80% smartsize
and sharpen this twice, I placed this on the left side of the taggie, use my sample as a guide
or place were you think it will look best on your taggie, get creative :)
Add same drop shadow as before to this one.
Open up KISM-GlamourAndGlitz-Ribbon1, c/p as new layer, resize this 3 times @80% smartsize
and sharpen either twice or 3 times, add same drop shadow as before, I placed this on the bottom
of the taggie some over the bottom part of the frames circles.
Open up KISM-GlamourAndGlitz-Ribbon2, c/p as new layer, resize this once @ 80% smartsize and
then again @ 85% smartsize, sharpen twice, I placed this one behind the other ribbon to peek out some.
Always use my sample as a guide or go your own way to put your own twist on it. Same drop shadow.
Open up KISM-GlamourAndGlitz-SmallDiamondBow, c/p as new layer, resize this one 7 times @ 80% smartsize
and sharpen at least 3 times or more depending how you want it to look. Same drop shadow and place
this one on the bottom right of the tag, on the ribbon layers above them, so it covers them some.
Open up KISM-GlamourAndGlitz-Bow5, c/p as new layer, resize this one 6 times @ 80% smartsize, mirror it once
and then sharpen at least 3 or 4 times to make the color pop again, same drop shadow, I placed this one
on the top of the tag on the frame part some so it looks attached to it some.
Open up KISM-GlamourAndGlitz-BeadSpill, c/p as new layer, resize this 4 times @ 80% smartsize
and sharpen twice, place these behind ALL layers to peak out some, play with it to your liking,
I then duplicated it and flipped it and placed on the other side to peek out some as well. Same drop shadow.
Open up KISM-GlamourAndGlitz-SequinHeart, c/p as new layer, resize this 8 times @ 80% smartsize
and sharpen at least 4 times, same drop shadow, I placed this on the bottom left of the tag on
the ribbons again some to cover the edges up a little. Place as you wish if you don't want it there.
Open up KISM-GlamourAndGlitz-Tiara1, c/p as new layer, resize 4 times @ 80% smartsize, rotate 10
degrees to the right, sharpen 4 or 5 times, same drop shadow, place this below the leaves and flower
layer so its behind those and place nicely on the frame above the face tube layer so it looks like
its on the head of the tube or the frame some. Use my sample as a guide.
Now this step is optional
Open your font of choice, write out your name, once you have your name, add an inner bevel to it
Use your own settings or you can use mine below.
Bevel-2 Width-5 Smooth-5 Depth-2 Ambience-2 Shineness-4 Angle-315 Intensity-36 Elevation-30 Color-White
Now with Eye candy 4000 pick two colors to go nicely with your tag that matches from the kit or tube.
I picked black and white to go over my pink color I did for my name,
Use these settings Glow width-3 soft corners-25 overall opacity-100 make sure draw only outside selection is checked.
I did the black color first, then repeated with same settings with white, when you do the color
depending how big you want the glow, just adjust it under color on the eye candy gradient glow.
I made mine small so I could do two. Add same drop shadow as before, duplicate once and merge those 2 together.
Add any copyright info that belongs and your watermark, and save as a png or jpg and your done!
Hope you enjoyed my new tutorial! Thanks for trying it.


0 comments:
Post a Comment