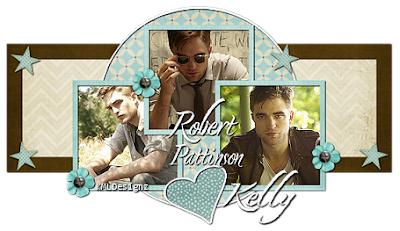
Robert Pattinson Scraps Tutorial
By KMLDesignz
December 15th 2010
Supplies Need
Template 141, Here
Scrap kit of choice or the one I used Here
Leaf It To Me SK
Font of choice, I used Nori
3 graphics of choice
No plugins needed :)
Let's get started
Open up the template, delete the copyright info (layer 8), I then cropped it out
some so it goes to 100%
I also deleted off the mask layer as I didn't use it, this is optional.
Its layer 2 if you delete it.
I then closed off all layers but raster 4, click inside one of the boxes
with your magic wand, I deleted the black, open one of your graphics
copy and paste as new layer, resize if needed to your liking, invert
then delete, bring this below raster 4, repeat for your remaining pics.
Then go back to raster 4 layer, select all, float, defloat, open up a paper
from the scrap kit, I used PP8, copy and paste as a new layer
resize it to your liking then click invert and delete, then select none.
I deleted raster 4 layer
I then added a drop shadow to the paper layer.
V&H-1
Opacity-100
Color-Black
Blur- 2.00
Open up all layers again, go to raster 3, click inside the circle with the
magic wand, select contract and put in 2, then I clicked on smooth under
selections then modify to smooth (put in 10 for both) it out before deleting the gray out.
Now open up another paper from the kit, I used Paper8
copy and paste as new layer, resize down some, invert, delete then select none.
bring this layer below raster 3, add the same drop shadow as before to raster 3.
select raster 5, click the box and then go to contract and put in 25
then delete, so you have only a border for the black box.
Open up another paper, I used PP9 for this one, resize some, invert, then delete, select none.
add the same drop shadow as before to this one. I deleted the gray border layer.
Now select the raster 6, click it with the magic wand, open up a paper again,
I used Paper7, copy and paste as new layer, resize some, invert, delete, select none.
drag this layer below the border layer we just did before.
Now click on raster 7, this should be the heart layer.
Click inside the heart, contract by 1, then smooth and click delete to get rid of the grey.
Open up another paper, I used Paper9, copy and paste as new layer, resize some, invert
then delete, add the same drop shadow as before to the white heart.
Time to decorate.
Open up the element folder from the kit
Open up flower 5, copy and paste as new layer. I resized this by 50% smartsize twice
then 85% smartsize 3 times, sharpened once and added the same drop shadow as before.
I then duplicated this to have 3 flowers, place them as above or as you like.
Open up Star 1 in the kit, copy and paste as a new layer, I resized this 5 times
doing 50% smartsize, then sharpen once. I duplicated this one too so I had 4
use tag above to place them or place them to your liking :) add the same drop
shadow as before.
Merge all layers visble. then choose your font of choice, I used Nori
Put your name on it and add the same drop shadow we used, duplicate it once
then merge down. add any copyright info and merge layers visble.
Save as a png or jpeg and your done!!
Hope you enjoyed my tut :)


