Selections Scrap Tutorial
By KMLDesignz
Written September 22nd 2008
Supplies Needed
3 Graphics of Choice, 1 Long one
1 Tube Of Choice (optional but adds to the tag)
2 Papers of choice or ones I supplied
Embellishments of Choice or ones supplied
Mask of Choice or one supplied
Filter Factory J Plugin (optional)
Font Of Choice
Supplies Here
Let's Get Started
Open up the supplies given
take the mask out of the supplies and place into your mask folder for psp.
Open up a new image 700*400 and minimize for now.
Open a new image up 548*201
Take your long graphic of choice, copy and paste as a new layer in the image you just made,
resize some so it fits nicely in, sharpen 2 times.
Resize all layers @ 75% smartsize sharpen once.
Add a Two inch black border around this image, copy.
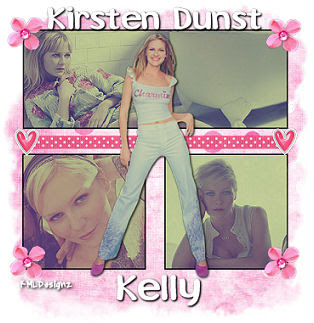
Maximize the 700*400 image and paste as a layer, place in middle, refer to tag above for placement. Minimize this again.
Open up a new image 260*241 and duplicate once so you have 2 boxes.
Take one of your other graphics and paste into one of the boxes, resize it some so it fits nicely into the box. sharpen 2 times, resize @ 65% smartsize once and sharpen 1 more time, add the same border as before. Now for your last graphic, repeat this same step you just did.
Now for my graphics I used the Filter Factory J plugin and used toners to add some effect to the pics. You can do that before you add the borders if you like, totally optional.
Take both of those boxes and copy and paste them on the image you minimized. Refer to tag above for placement. Merge visble both the smaller graphics together but none of the others.
Open up the ribbon in the supplies or one of choice.. I used Ribbon 1, copy and paste as a new layer. Place this between the graphics in the middle were the space is.
Open up the heart accent in the supplies, I used heart 1, copy and paste onto the image, resize once @ 65% smartsize and sharpen once. Duplicate this once, and place on the ends of the ribbon.
Open up the flower in the supplies, copy and paste as a new layer and resize this @ 65% smartsize twice and sharpen once.
Open up the gem in the supplies, copy and paste as a new layer and resize this @ 75% smartsize twice and sharpen once, Now for this I colorized mine to match my tag using the filters unlimited plugin color effects and then colorize HSB with the settings of the color of the flower.. Now if you want you can also colorize the flower if your using different colors.
I then added a light drop shadow to the gem
V&H= 1 Opacity=46 Blur= 3.00 color=BLK
Merge the flower and gem together then duplicate 3 times so you can place a flower in each corner of the tag, use tag above for placement.
Open up your tube of choice ( if using one) and copy and paste onto your image, resize some so it fits nicely in the middle of the tag.
Merge visble all layers except for raster 1 and resize the tag @75% smartsize all layers NOT Checked. Sharpen once, open up the paper of choice, I used paper 1 in the supplies. Colorize to match the tag. Paste as a new layer onto your image, drag this layer above raster one. Add the mask you placed in the mask folder and apply to the paper. Delete Mask raster 2 layer and click yes when the box pops up, then merge mask group.
Add any other embellisments if you want, make your tag your own ;)
Merge visble all layers but raster one again.
Open font of choice and if you used a celebrity in the graphics, write out their name on the top of the tag and give it the following drop shadow.
V&H = 1 Opacity = 100 Blur = 3.00 Color = BLK
Duplicate once.
Add your name to the tag and repeat the step above for that as well.
Add any copyright/watermarks to the tag, and save as a jpeg and your all done!
Hope you enjoy the tut :)


1 comments:
Ya know, how am I gonna find time to play with your tutorials, write in my stories, write my own tutorials, make my own scrappy taggies and letters, and learn how to make my own scrap kits on top of my day job, and playing wife and housemaid?
I love being this insane!
Love the new Tutorial Kelly... I'll have to make time to come back and try it out!
Post a Comment