Supplies Needed
1. Open a new workspace 700 *400 in size (resize later)
2. Copy the first graphic on your new workspace resize by 80% smartsize all layers unchecked then sharpen twice.
Repeat step 2 for following graphics
Once you have all your graphics the same size and ready line them up to how you want them overlapping is fine since your going to blend them into each other.
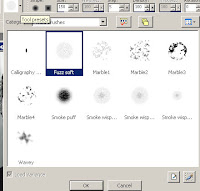
activate your eraser tool, pull down and select your fuzz soft point
When you have that ready, highlight one of your layers and slowly erase some of the picturethat your on so it looks like its blending into the other one, then pick another layerand do the same thing as you did with your first layer.
Once you are done to your likeing, merge visble the layers, you will have this look below..

and then if you want add any plugin effects, I always do the zero plugin and choose porcelain effect so it gives it asoft look to it.
Resize the tag to your likeing. Remember to always sharpen atleast once
Add any textures you would like by adding a new layer select all then paste texture into selectionand mess around with the blend modes on that texture layer and then lower the opacity to it.
When you are done. Add your name with font of choice and any copyright info and watermark
Save as a jpeg and your done.
Congrats you just made a blend!!
Tutorial by KMLDesignz
End results to some of my blends


1 comments:
Hey Kelly love the tut, I've used it in a simplified way to make a new stat, which you should be getting shortly - yay!
hugs, Jane
Post a Comment