A Witch’s Special Brew Tutorial
October 9th 2011
By: KMLDesignz
Supplies Needed:
PSP, any version will do, I am using PSP 9
Tube of choice, I am using the awesome artwork of Chuchilko
www.picsfordesign.com
This is a PTU tube and you need a license to use it, you can get that @ PFD here
Scrap kit of choice, I am using the awesome Designs By Sarah’s kit Witches Brew
This is a PTU kit and you can get that @ PMTWS here and here
Eye Candy 4000 Gradient Glow (Optional)
Font of choice, I am using font JaneAusten
Let’s Get Started:
Open up PSP and your supplies, minimize for now, Open up a new image 700*500, we can resize later if needed.
Open up PSP and your supplies, minimize for now, Open up a new image 700*500, we can resize later if needed.
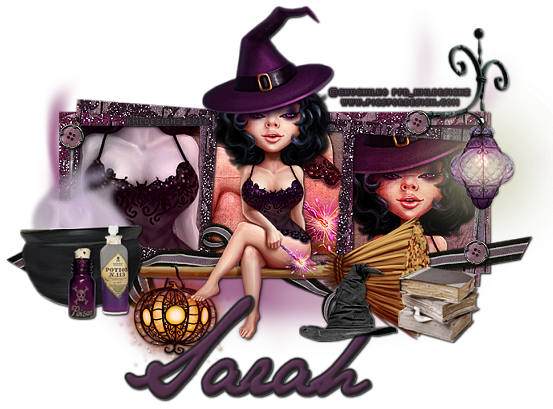
Open up a frame of choice, I am using frame 1 from the kit I have, C/P as new layer, resize this one @ 80% smartsize twice and sharpen twice.
Open up a paper of choice, I am using paper 2 from the kit I have, C/P as new layer, resize three times @ 80% smartsize, sharpen three times, bring below the frame layer and erase any that hangs over. Give your frame layer a drop shadow now, V&H-1 Opacity-100 Blur-2 Color-BLK.
Open up your tube, C/P as new layer, take a different part of the tube and put in the squares of the frame some, resize nicely so they fit nicely in them, sharpen at least twice, same drop shadow, then take the main tube again, C/P as new layer and resize nicely @ 80% smartsize a few times, sharpen at least twice, same drop shadow, I changed the blend mode of the tubes we did in the frame, I changed the one on the left to Luminance Legacy and then hardlight for the other.
Let’s Decorate The Taggie:
Open up a cauldron of choice, I am using the one in the kit, C/P as new layer, resize this one 5 times @ 80% smartsize and sharpen twice, add same drop shadow, I placed this on the left side of the tag on the bottom.
Open up a stack of books of choice, I am using the one in the kit I have, C/P as new layer, resize this one @ 80% smartsize 8 times and sharpen three times, same drop shadow as before. I placed this on the right bottom side of the tag.
Open up a light lamp of choice, I am using the one in the kit I have, C/P as new layer, resize this @ 80% smartsize 3 times then mirror and sharpen three times, I placed mine at the top right of the tag on the frame some, same drop shadow as before.
Open up a ribbon of choice, I am using ribbon 2 from the kit I have, C/P as new layer, resize this once @ 80% smartsize and sharpen twice, same drop shadow as before, place this below the tube layer, on the bottom of the tag, make sure it’s below all layers but the frame.
Open up a button of choice, I am using button 3 from the kit, C/P as new layer, resize this @ 80% smartsize 8 times and sharpen three times. Same drop shadow as before, I duplicated twice so I had three, place them nicely around the tag, use sample as guide or place as you wish.
Open up 2 potion bottles of choice, I am using 6 and 9 from the kit I have, C/P as new layer for each, resize this @ 80% smartsize 7 times for the smaller one and then 6 times for the bigger one, sharpen three times for each, same drop shadow as before, I placed mine near the cauldron.
Open up a witch’s hat of choice, I am using the one in the kit, C/P as new layer, resize this @ 80% smartsize 5 times and sharpen 4 times, same drop shadow as before, I placed this near the book pile some above most of the layers.
Open up a smoke cloud of choice, I am using the witch’s smoke in the kit, C/P as new layer and bring behind all layers.
Open up your font of choice, add your name and any gradient glow you want, as well as any copyright info that belongs and save as a png or jpg and you’re done!
Thanks for trying my new tutorial, I hope you liked it.


1 comments:
thank you!!! awesome tag!
Post a Comment