On Captain Jack’s Tide Tutorial
October 8th 2011
By: KMLDesignz
Supplies Needed:
Any PSP version will do, I am using PSP 9
Tube of choice, I am using a FTU tube from © Danielle Pioli, you still NEED a license in order to use it.
www.bloody25.deviant.com
You can purchase that @ MTA here
Scrap kit of choice, I am using On Stranger’s Tide From A Tagger’s Scraps @ SATC
http://itsbacchus.blogspot.com/
This is a PTU kit and you can purchase @ SATC here
Eye Candy 4000 Gradient Glow (Optional)
Font of choice, I am using Treasure Map Deadhand
Let’s Get Started:
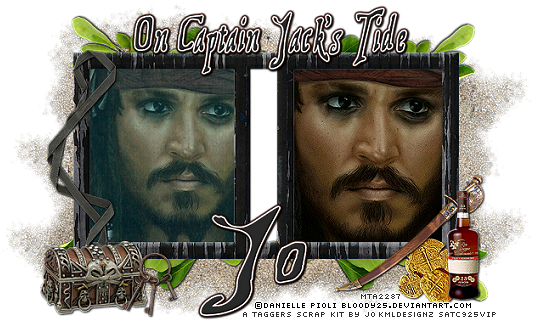
Open up PSP and your supplies, minimize them for now, Open a new image 700*500, we will resize later if needed or crop out.
Open up a frame of choice, I am using frame 4 from the kit I am using, C/P as new layer, resize twice @ 65% smartsize, sharpen twice, click inside your frame and expand by 5, open up a paper of choice, I am using paper 19 from the kit I am using, C/P as new layer, resize @ 65% smartsize once then again @ 85% smartsize, sharpen twice and then click invert, delete the extra that hangs, invert again and then select none, bring below the frame layer.
Open up your tube of choice, I am using the one I have, it’s a close up, C/P as new layer, resize twice @ 85% smartsize, sharpen twice and place inside one the frame squares, erase any that hangs over, then C/P again but no resize, fit it nicely inside the other square, erase any that hangs over, sharpen twice. On your first one you did, lower the opacity to 82, add a drop shadow to both tube layers and frame layer as well, V&H-1 Opacity-100 Blur-2 Color-BLK.
Let’s Decorate Your Taggie:
Open up a gold coin pile of choice, I am using the pieces of eight from the kit, C/P as new layer, resize twice @ 65% smartsize, sharpen twice and add the same drop shadow as before, I placed this on the right side of the tag on the bottom.
Open up a knife/sword of choice, I am using the in the kit I have, C/P as new layer, resize twice @ 65% smartsize, sharpen twice, same drop shadow, I mirrored mine so it faced the other, you don’t have to, place this nicely with the coins on the bottom right of the tag.
Open a bottle of rum or any type of bottle you have, I am using the rum bottle from the kit, C/P as new layer, resize this @ 65 twice, sharpen twice and same drop shadow, place this with the knife and coins.
Open up a knotted tie of choice, I am using the black one from the kit, C/P as new layer, resize twice @ 65% smartsize, sharpen twice, same drop shadow as before, I mirrored mine again and then placed on the left side of tag.
Open up a sand scatter of choice, I am using the one in the kit, C/P as new layer, resize once @ 65% smartsize sharpen once, place behind all layers on the bottom, same drop shadow as before just change the opacity to 49% duplicate once and then mirror. I duplicated again twice, and mirrored one, and placed on the top some. Merge these layers together.
Open a leave cluster of choice, I am using leaf 3 from the kit (it’s called greenery) C/P as new layer, I rotated mine 90 degrees to the right, resize twice @ 65% smartsize, sharpen twice and place behind all layers but above the sand, duplicate and mirror to the other size, same drop shadow as before, change the opacity back to 100.
Open up a treasure chest of choice, I am using treasure chest 1 in the kit, C/P as new layer, resize twice @ 60% smartsize, sharpen twice, same drop shadow as before, I placed this on the left bottom of the tag above all layers.
Open up a key ring of choice, I am using the one in the kit, C/P as new layer, resize twice @ 60% smartsize, sharpen twice, same drop shadow as before, place next to the chest.
Open up your font of choice, add your name and any copyright that belongs and save as png or jpg and you’re done.
Thanks for trying my new tutorial, I hope you enjoyed playing with it.


0 comments:
Post a Comment