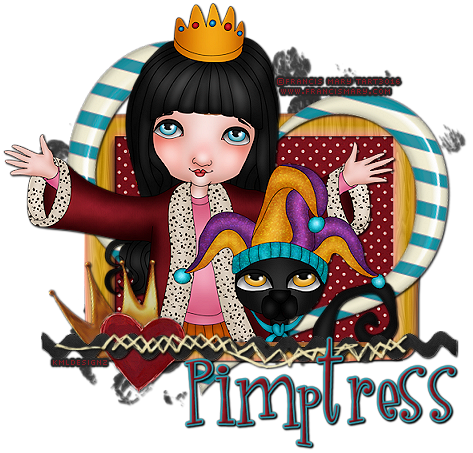
Queen For The Day Tutorial
October 2nd 2011
By: KMLDesignz
Supplies Needed:
Any version of PSP will work. I am using PSP 9
Tube of choice, I am using the artwork by Francis Mary @ MTA
www.francismary.com
www.francismary.com
This is PTU and you need a license to use it, you can purchase here
Scrap kit of choice, I am using the adorable Queen For The Day by Pimpd Designz @ PMTWS
http://pimp-your-tags.blogspot.com/
Eye Candy 4000 Gradient Glow (Optional)
Font of choice, I am using Randumhouse
Let’s Get Started
Open up your supplies and psp, minimize the supplies for now, open a new image 700*500, we will resize/crop out later if needed.
Open up a frame of choice, I am using frame 3 from the kit I am using, C/P as new layer, resize this once @ 65% smartsize and sharpen twice, click inside with your magic wand, expand by 5 and then pick out your paper of choice, I am using paper 12 from the kit I have, C/P and resize this 3 times @ 80% smartsize, sharpen twice and then click invert, delete and then invert again, and select none.
Bring your paper layer below the frame and give your frame layer a drop shadow, V&H-1 Opacity- 100 Blur-2 Color-BLK
Open up your tube of choice, C/P as new layer, depending the size and which tube you’re using, resize nicely to fit into the tag, I did mine once @ 70% smartsize and sharpened once. Add the same drop shadow as before, bring this below your frame layer, duplicate your frame layer bring one below the tube and one above the tube, the one above the tube, erase any that covers the tube is shouldn’t.
Let’s Decorate The Taggie!
Open up a crown of choice, I am using the one in the kit I have, C/P as new layer, resize this one @ 80% smartsize 6 times and then rotate 15 degrees to the left, sharpen three times and same drop shadow as before to it, I placed this on the left side of the tag above all layers, on the bottom part.
Open up a heart of choice, I am using heart 1 from the kit I have, C/P as new layer, resize this one @ 80% smartsize 6 times and sharpen three times, same drop shadow as before, I placed this over the crown we just did a little.
Open up a ribbon of choice, I am using ribbon 6 from the kit I have, C/P as new layer, resize this one twice @ 80% smartsize sharpen twice and same drop shadow as before, place this on the bottom of the tag, above all layers.
Open up a stitch of choice, I am using the one in the kit, C/P as new layer, resize this one @ 80% smartsize once and then again @ 85% smartsize and sharpen twice, same drop shadow and place this above the ribbon we just did some.
Open up a heart shaped frame of choice, I am using the one in the kit I am using, C/P as new layer, resize this one @ 80% smartsize twice, sharpen twice and same drop shadow as before, rotate 15 degrees to the right. I placed this behind the tube layer.
Open up a print of choice, I am using print 2 from the kit, (This is like a splat of something) C/P as new layer, resize this @ 80% smartsize once, sharpen once, duplicate and place these both so they peak out some on the top and bottom of the tag, behind ALL layers, same drop shadow as before.
Open up your font of choice, add your name and any gradient glow you choose or leave as is, then any copyright info that belongs. Save as a png or jpg and you’re done.
I hope you enjoyed my new tutorial, thanks for trying it!


0 comments:
Post a Comment