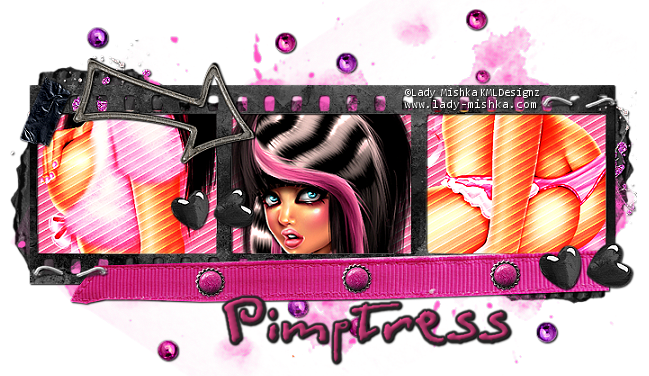
Sexy Emo Beat It Tutorial
August 24th 2011
Written By KMLDesignz
Supplies needed
Tube of choice, I am using PTU by ©Lady Mishka
www.lady-mishka.com
You can purchase that here
Scrap kit of choice, I am using PTU Kit Beat It By Pimpd Designz
http://pimp-your-tags.blogspot.com/
You can get that here and here
Font of choice, I am using Contrivance
Let's Get Started
Open up your supplies and minimize for now.
Open a new image 700*500, we will resize later if needed.
Open up pd-frame-02, c/p as new layer
Open up your tube of choice, now depending on which one your
using, this will be a little different, I took sections of my
tube I am using and fit nicely into the frame, different parts
of the body of the tube, then on the right of the frame were I
put a section in, I changed the blend mode to hard light and
duplicated once, DO NOT merge together, I did the same for the left.
I left the middle one alone and added a drop shadow to it.
V&H-1 Opacity-100 Blur-2.00 Color-BLK
Now close all your tube layers and click inside the first square
of your frame, expand by 3
Open up pd-pp-02, c/p as new layer, resize twice @ 70% smartsize
and sharpen twice, invert and delete the excess that hangs, repeat
this step for the other two squares, then merge together and bring
below all layers. Add the same drop shadow as before to your frame.
You can now open back the tube layers.
Let's Decorate the taggie
Open up pd-print-02, c/p as new layer, bring below all layers, duplicate
and flip and place on the other side, make them peek out nicely, I didn't
resize mine, I left as is, you can resize if you like.
Open up pd-ribbon-01, c/p as new layer, bring this above all layers,
I put mine on the bottom of the frame some and added same drop shadow
as before.
Open up pd-tape-01, c/p as new layer, resize 3 times @ 60% smartsize
and sharpen twice, add the same drop shadow as before, I rotated mine
25 degrees to the right before resizing and sharpening. Place in top left.
Open up pd-staple, c/p as new layer, place on top right of the tag
and duplicate and place on the bottom left of the tag. Use sample as
a guide or place as you wish, get creative.
Open up pd-beads-01, c/p as new layer, resize once @ 60% smartsize
sharpen once and place behind all layers, same drop shadow as before,
I duplicated and flipped then mirrored so I have 2.
Open up pd-cardboard, c/p as new layer, put this behind all layers,
duplicate and mirror then flip, so you have 2 peeking out.
Open up pd-glitter-01, c/p as new layer, resize 3 times @ 70% smartsize
sharpen twice, add same drop shadow as before, since I made these
small, I put it on the cardboard layer, so it looks like its on it.
Duplicate and place this one on the other cardboard layer.
Open up pd-arrow, c/p as new layer, resize once @ 45% smartsize
sharpen once and flip, place this on the top of the frame, like its
pointing to the face of the tube. Same drop shadow as before.
pd-cap-02, c/p as new layer, resize twice @ 85% smartsize, then once more
@ 65% smartsize, sharpen twice and add same drop shadow, duplicate twice
so you have 3 layers and place them nicely on the ribbon layer.
Open up pd-heart-01, c/p as new layer, resize once @ 45% smartsize and then
once @ 75% smartsize, sharpen twice and add same drop shadow as before,
duplicate once and place around the tag nicely, use sample as guide or
go your own way and get creative.
Open up you font of choice, add your name and any copyright info that belongs
and save as a png or jpg and your done!
Thanks for trying my tutorial!


0 comments:
Post a Comment