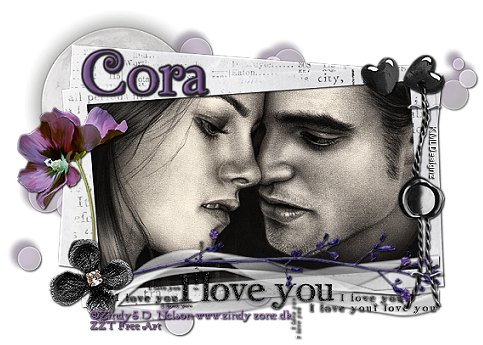
Edward & Bella Break Me Tutorial
August 18th 2011
By: KMLDesignz
Supplies Needed
PSP, any version will work, I use 9
Tube of choice, I am using a FTU by © Zindy S. D. Nielsen
zindy-zone.dk
You can get that here.
Even though the tube is free, you still need to add the correct copyright info on the tag.
Scrap kit of choice, I am using PTU kit Break Me by Pimpd Designz
http://pimp-your-tags.blogspot.com/
You can get that here and here.
Font of choice, I am using Zephyr
Let's get started.
Open up your supplies and minimize for now.
Open up new 700*500 image, we will resize later if needed.
Open up pd-frame-05, c/p as new layer, resize once @ 70% smartsize
and sharpen once or twice, which ever looks best.
Click inside your frame, expand by 3.
Now depending on the tube you are using, the resize will be different,
c/p your tube as new layer, resize this nicely to fit into the frame nice.
Sharpen at least twice, I did mine 3 times, then add clarify to the tube
using 5 as the settings, this is under enhance photo.
Invert, and delete any excess that hangs out, select none.
Make sure your tube layer is below the frame layer.
Add a drop shadow to your frame layer using these settings.
V&H-1 Opacity-100 Blur- 2.00 Color-BLK
Time To decorate your taggie!
Open up pd-flower-03, c/p as new layer, resize this one 4 times @ 80% smartsize,
sharpen 3 times, and add same drop shadow as before. I put this one at the
bottom left of the tag.
Open up pd-hearts-01, c/p as new layer, resize this one 5 times @ 80% smartsize,
sharpen 3 times and add same drop shadow as before. I put this on the top right
side of the tag.
Open up pd-rope, c/p as new layer, resize this one 4 times @ 80% smartsize,
sharpen 3 times, and add same drop shadow as before. Place this one on the right
side of the tag.
Open up pd-staple, c/p as new layer, resize this one 4 times @ 80% smartsize,
sharpen twice, add same drop shadow as before. I placed one on the rope.
Then duplicated and put the other on the bottom of the rope, use sample as guide.
Open up pd-print-01, c/p as new layer, resize this once @ 80% smartsize, sharpen once.
Add the same drop shadow as before, place this behind all layers so it peeks out nicely.
Open up pd-wa-01, c/p as new layer, resize this one 3 times @ 80% smartsize, sharpen twice
and duplicate once, then merge together and add same drop shadow as before.
I placed this on the bottom of the tag nicely between the flower and rope, put this layer
under the flower layer.
Open up pd-leaf-02, c/p as new layer, resize this one twice @ 80% smartsize, sharpen twice
and add the same drop shadow as before, place this nicely over the word art we just did.
You can always use the sample as a guide or place were you want.
Open up pd-flower-01, c/p as new layer, resize this one 4 times @ 80% smartsize, sharpen 3 times,
and add same drop shadow as before, I placed this one below the black flower layer
nicely on the left side of the tag.
Open up pd-moon-01, c/p as new layer, resize this one 3 times, sharpen twice and add same drop
shadow as before, I place this one behind all layers nicely on the top right, to peek out some.
Open up your font of choice, add your name and any copyright info that belongs and save
as a png or jpg and your done!
Hope you enjoyed my new tutorial, thanks for looking!!


0 comments:
Post a Comment