 Scrap Tutorial Written By KMLDesignz
October 22nd 2008
Supplies Needed
Scrap elements of choice or ones in the supplies
1 Graphic of Choice or one in supplies
Font Of Choice
Mask in the supplies
Plugin Xenoflex 1.0 Crumble
Filter Factory J Plugin Toners
You can get those here, go to F and then X
Let's Get Started
Open up the supplies and minimize them in psp
Open up a new image 600*400, you can resize later if you want.
Open up the image of choice and copy and paste as a new layer, resize this to your liking, then use the unsharpen mask with these settings
Radius- 1.00 Strength- 64 Clipping- 4.00
Do this at least 2 times to your image.
I then added the Filter Factory Toners to my image with these settings
Red- 19 Blue- 44 Green- 14
I did this like 3 times to make it look cloudy.
I did this like 3 times to make it look cloudy.
Open up the SBS_WPO2_RoundedWhite.png and copy and paste this on your image as a new layer, I resized mine @ 50% smartsize size till it fit nicely around the image your using, then I used the same unsharpen mask settings as before, then I duplicated this layer 2 times merge those layers together, add a drop shadow with these settings
V&H- 1 Opacity- 100 Blur- 3.00 Color- Blk
Then lower this layer to like 76 in the layers.
Open up 1.png and paste as a new layer, resize this layer @ 70% smartsize and sharpen with the same settings as before then use your deform tool so it fits nicely behind your image, now go to your Xenoflex plugin and choose crumble with these settings.

Open up the lliella_JDreams_ribbon1.png and copy and paste on your image as a new layer, I colored mine to match my tag, you can do the same, I then resized it to my liking so it fits on the image, see above for placement. Give this the same drop shadow as before.
Open up the lliella_JDreams_silkflower.png and copy and paste as a new layer, I colored mine to go with my color scheme of the tag I did. You can do the same, then I resized mine @ 40% smartsize 2 times then once at 85% smartsize and used the same unsharpened mask settings as before and same drop shadow. See above sample for placement.
Open up the star tube in the supplies and copy and paste as a new layer. I resized this @ 40% smartsize once, then used the unsharpen mask settings again once. See sample for placement.
Open up the bow in the supplies and copy and paste as a new layer, I colored mine again to match the tag, you can do the same, Resize this once @ 40% smartsize and place in the top right corner of the tag, add the same drop shadow.
Now for my tag I duplicated the flower I used and resized it @ 40% smartsize again to place in the middle of the bow and same sharpen settings, You can leave it as is or do this.
Open up the scrap paper and paste as a new layer on your image, resize this @ 35% smarsize once, then same sharpen, and give it the same drop shadow but then repeat with the V&H with
-1 and place this behind your image, duplicate and then flip and mirro so its on the other side and you have both peeking out some, look at sample for idea.
Open up the lliella_JDreams_beads3.png and copy and paste as a new layer, I colored this to match as well, Resize to your liking, place this behind the note paper, look at the sample for placement, I then duplicated once and mirrored it. Add the same drop shadow to these layers.
Open the treed-icandy-paintblack.png and paste as a new layer, I colored this one to match as well, resize @ 40% smartsize once, sharpen with the same settings, then add the same drop shadow, I placed this above the doodles we just did but behind the note paper. Duplicate so you have two of them and flip then mirror.
Open the Bracket.pspimage and paste as a new layer, Color to match the tag, resize this layer @ 50% smartsize once, sharpen, then add same drop shadow, I placed these behind the note paper but above the doodles we did.
Find your raster 1 layer, it should be blank, flood fill this layer with a color that matches your tag. Open the mask I supplied and apply this to the layer you just filled.
Delete mask raster, then merge group together.
Resize this layer @ 70% smartsize, then take your deform tool and bring it some more to your liking.
Go to effects, texture effects then click on texture and find the texture named Canvas Coarse and apply with these settings
Size- 77% Smoothness- 0 Depth- 1 Ambience- 0 Shininess- 0 Angle- 315 Intensity- 50 and Elevation- 30 color- white, Apply that once.
Apply an inner bevel to this layer with these settings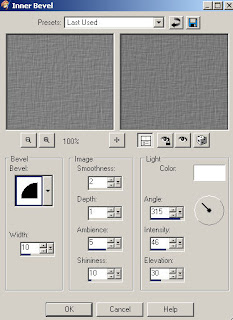
Add the same drop shadow as before, then switch the 1 with -1
Go back to effects, texture effects, then click on weave. Apply with these settings.
Go back to effects, texture effects, then click on weave. Apply with these settings.
Gap Size- 1 Width- 4 Opacity- 1 Fill gaps, both colors- white
Apply just once.
Now if your graphic was a celebrity, add there name like mine in the sample and give the same drop shadow, if yours isn't a celeb, add which ever you want.
Add your name and any copyright/watermark info and save.
I hope you enjoyed the tutorial.
Another sample with this tutorial


3 comments:
Great one dear!
Hugs,
Rock
Love it! This is going to be a lesson for November in Twilight Saga Stats N Tags! yay!!!! I can't wait to make a few with this one! Awesome job Kelly!
Awesome work!!
Post a Comment