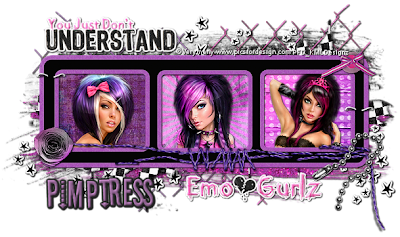
EMOlution Tutorial
By KMLDesignz
May 24th 2011
Supplies needed
3 Tubes of choice
I am using PTU tubes by verymany
http://picsfordesign.com/en/
You need a license to use them which you can get here
Scrap kit of choice, I am using PTU by Pimpd Designz called EMOlution
http://pimp-your-tags.blogspot.com/
You can purchase that here and here
Word Arts of choice- the ones I am using are from PTU kit (optional)
Emo Girlz rock mix and match collab kit, you can purchase at same site above.
Font of choice, I am using Stereofidelic
Let's get started
Open up your tubes of choice and scrap kit, set them aside for now.
Open up a new image 700*500, we can resize later if we want.
Open up pd-frame-02, copy and paste as new layer, resize once @ 70% smartsize and sharpen once.
Click inside your first square with your magic wand, expand by 5
Open up pd-pp-08, copy and paste as new layer, resize 3 times @ 70% smartsize,
sharpen twice or to your liking. Bring this below the frame layer.
Repeat this step with 2 other papers or use the same, its up to you, I used
pd-pp-10 and pd-pp-11 for my other two squares.
Let's open up your tubes and pick your first one, depending on your tubes you are
using, resize them nicely, sharpen at least once or twice, add a drop shadow to the tube.
V&H-1 Opacity-100 blur-2.00 color-BLK, then erase any of the tube that hangs over the frame
so its just the head shot in the frame, see my sample as a guide. Repeat for other 2 tubes.
Add the same drop shadow to your frame as well.
Time to decorate your taggie to make it purrty :)
Open up pd-print-04, copy and paste as new layer, resize twice @ 70% smartsize and
sharpen twice, add an inner bevel to this layer with these settings
Bevel-2 width-5 smoothness-5 depth-2 ambience-2 shininess-4 color-white angle-315
intensity-50 elevation-30 then add same drop shadow as before. Place bottom left of tag.
Duplicate this layer and flip it, then place on the right top of the tag, place
both of these behind all the layers so they peak out. use sample as guide.
Open up pd-stitch-03, copy and paste as new layer, resize once @ 95% smartsize,
sharpen twice and add same drop shadow as before, I place this on the bottom of the frame.
Open up pd-staple, copy and paste as new layer, resize twice @ 70% smartsize
sharpen twice and add same drop shadow as before, I placed one on the top of the frame
on the left and then duplicated and placed on the middle right of the frame.
Open up pd-stars-01, copy and paste as new layer behind all layers, leave as is.
I added a gradient glow of white to mine with eye candy 4000 this is optional, if
you do, add a drop shadow after and duplicate once then merge those two together.
Open up pd-flower-02, copy and paste as new layer, resize 3 times @ 70% smartsize
and sharpen twice, add same drop shadow as before. I placed this on left bottom of frame.
Open up pd-glitter-02, copy and paste as new layer, leave as is and add same drop shadow.
Add to bottom of tag behind all layers.
Repeat this for the pd-glitter-03 and place on the top behind all layers.
Open up pd-fence-01, copy and paste as new layer, resize twice @ 70% smartsize
sharpen twice, and mirror it once, add same drop shadow as before, repeat this with
pd-fence-02 and put on the other size, use sample as guide.
Open up pd-chain-01, copy and paste, resize 3 times @ 70% smartsize, sharpen twice
and add same drop shadow as before, place on the bottom right of the frame, on top of all layers.
Open up pd-button-01, copy and paste as new layer, resize 4 times @ 70% smartsize
sharpen twice and add same drop shadow, place this on top right of the tag on the frame, on top of all layers.
Open up your word arts if any and apply them to the tag.
Open up your font of choice, add your name and any copyright info that belongs.
Save as a png or jpeg and your done!
Hope you enjoyed my new tutorial.


0 comments:
Post a Comment