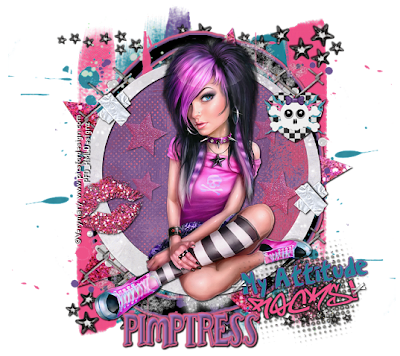
Emo Attitude Scraps Tutorial
KMLDesignz
May 9th 2011
Supplies needed
Paint Shop Pro 9, can be done in other versions.
Tube of choice, I am using a PTU one by Verymany
http://picsfordesign.com/en/
You need a license to use them, you can purchase here
Scrap kit of choice, I am using PTU scrap kit, Attitude II by Pimpd Designz
http://pimp-your-tags.blogspot.com/
You can purchase that here and here
Font of choice, I am using is Lushus
Open up your supplies and minimize for now.
Let's get started.
Open up a new image 700*500, we can resize later
Open up pd-frame-03, copy and paste as a new layer, resize twice @ 70% smartsize
and sharpen once.
Click inside the frame with your magic wand, expand by 5
Open up pd-pp-03, copy and paste as new layer, resize twice @ 70% smartsize
and once @ 85% smartsize, sharpen twice, invert, delete, then select none.
Bring this layer below your frame layer.
Add a drop shadow to your frame layer
V&H-1
Opacity-100
Blur-2.00
Color-BLK
Open up your tube of choice and depending which tube you are using, resize nicely,
so it fits nicely in front of the frame, under enchance photo, click claify and
add it to the tube layer with the settings at 5.
(this is optional) Add same drop shadow to the tube as we used before.
Time to decorate the taggie :)
Open up pd-glitter-01, copy and paste as new layer, resize twice @ 70% smartsize, sharpen
once, I erased the dots that were on the outside of the glitter, I placed this on
the bottom left of the taggie behind all layers, duplicate once, then flip and mirror.
Add drop shadow
V&H- 1
Opacity-28
Blur-2.00
Color-BLK
Open up pd-fence, copy and paste as new layer, resize twice @ 70% smartsize
sharpen once, add same drop shadow as we did to the frame and tube.
Duplicate once and flip then mirror, place these so they peak out nicely on the tag.
You can use my sample as a guide or place to your liking. These are above the glitter.
Open up pd-kiss-01, copy and paste as new layer, resize 4 times @ 70% smartsize
sharpen twice and add same drop shadow as we did to the frame. I place this on the
left side of the tag, place there or to your liking.
Open up pd-print-01, copy and paste as new layer, resize once @ 70% smartsize.
Place this behind all the layers. Duplicate once, flip and mirror.
Open up pd-tape, copy and paste as new layer, resize 6 times @ 70% smartsize.
Rotate to the right @ 50 degrees, all layers NOT checked, sharpen twice, add
same drop shadow as before, then duplicate, and rotate @ 90 degrees to the left
so it makes and X pattern with the tape. Duplicate and place on the other side.
Use my sample as a guide.
Open up pd-skull-heart, copy and paste as new layer, resize 5 times @ 70% smartsize
sharpen once and add same drop shadow as before, I placed this on top right side of the tag
you sample as guide or place as you like.
Open up pd-wa-02, copy and paste as new layer, resize 3 times @ 70% smartsize
Rotate to the left @ 10 degrees, sharpen twice. Add the following drop shadow
V&H-1
Opacity-39
Blur-2.00
Color-BLK
Duplicate once and merge these layers together.
Open up pd-staple, copy and paste as new layer, resize 4 time @ 70% smartsize, sharpen once
duplicate once, and rotate to the left @ 40 degrees, merge together,sharpen once.
Add same drop shadow as we did for the word art. place this on the wordart like
its holding, use my sample as a guide. Duplicate and place on other side of word art.
Use my tag as a guide.
Open up pd-stars-03, copy and paste as new layer, bring this below all layers and
leave as is. Add same drop shadow as we did for the frame.
Copy and paste the same star, resize once @ 15% smartsize and sharpen once.
Change the opacity to 50, then duplicate once, place these around the frame on the
paper, then duplicate once more and resize @ 70% smartsize and duplicate again,
and place around like the bigger ones, use my tag as a guide.
Bring these all below the frame layer but above the paper layer.
Open up pd-doodle-01, copy and paste as new layer, resize once @ 70% smartsize,
bring this below all the layers.
Add a gradient glow with the color purple from the paper layer then with the pink color from the paper
add another one, and add same drop shadow as before with the frame layer,
I used Eye candy 4000 for the gradient glow.
Open up pd-print-04, copy and paste as new layer, resize @ 70% smartsize once,
rotate @ 90 degrees to the left, resize once more @ 85% smartsize, sharpen once
duplicate, merge together then duplicate again and mirror then flip, then merge
together again and bring this layer below all layers.
Open up pd-stars-01, copy and paste as new layer, resize twice @ 70% smartsize
sharpen once, place near bottom or the tag, Add same drop shadow as the frame
duplicate, flip and then mirror so its on top of the tag as well.
Open up your font of choice, add your name and any copyright info that belongs and
your watermark, save as a png or jpeg and your done! :)
Hope you enjoyed my tutorial.


0 comments:
Post a Comment