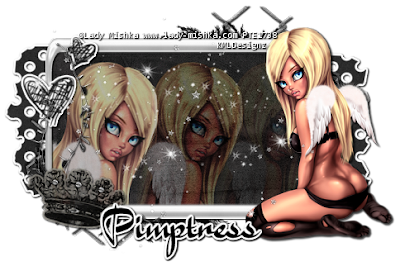
Lady Mishka Goth Angel Tutorial
By KMLDesignz
Supplies Needed
Tubes of choice, one close up, one full body
The one I used is a PTU tube by Lady Mishka
http://www.lady-mishka.com/
You need a license to use it, which you can
purchase both here
http://psptubesemporium.com
Scrap kit of choice or the one I used
PTU kit Can't be Tamed by Pimpd Designz
http://pimp-your-tags.blogspot.com/
You can purchase that here and here
Font of choice, the one I used is Fabius
Lets get started
open 600*400 image, we will resize later
Open up pd-frame-06, copy and paste as a new layer
resize once @ 70% smartsize, I then used the deform tool and stretched
the frame so it would be wide in height some, use my tag as guide.
Sharpen once.
With your magic wand, click inside your frame, expand by 6
Open up pd-pp-09, copy and paste as new layer, resize this paper layer
@ 70% smartsize twice then sharpen twice. Invert, then delete and select none.
Add drop shadow to your frame
V&H-1
Opacity-100
Blur-2.00
Color-BLK
Open up your tube of choice, copy and paste as new layer
now depending which tube you are using, resize it down some to your liking.
Bring this below the frame layer, I then duplicated mine twice and moved them over
some so they are lined up nicely next to eachother, on the duplicated layers
switch the blend mode both to soft light, then on the last duplicate, bring the
opacity to 38 or play around till you like it, so it looks like it faded out.
On your original tube layer, bring the opacity to 66 or to your liking.
Open up your second tube (if your using one) the full body one.
Copy and paste as new layer and resize to your liking, and place on right
side of the frame. Sharpen once, add same drop shadow as before.
Time to decorate :)
Open up pd-hearts-01, copy and paste as new layer, resize @ 70% smartsize 5 times
bring to the top left corner of the tag, sharpen twice
I added a gradient glow of white with eye candy 4000, this is optional
Open up pd-fence-01, copy and paste as new layer, resize @ 70% smartsize 3 times
sharpen twice, add same drop shadow as before, place this behind all layers.
duplicate once and flip it then mirror and place it on the bottom left side
and have it poke out some, use my tag as a guide.
Open up pd-feather-01, copy and paste as new layer, bring this below all layers
and have it poke out some on the bottom left, then duplicate and flip then mirror
and have it poke out some on the top right, use my tag as a guide.
Open up pd-flora-01, copy and paste as new layer, resize 3 times @ 70% smartsize
mirror and place this on the left side of the tag, use my tag as a guide, sharpen twice
and add same drop shadow as before.
Open up pd-crown, copy and paste as new layer, resize 3 times @ 70% smartsize
sharpen twice, add same drop shadow as before, rotate 10 degrees to the right
and place in bottom right corner of tag. Use my tag as a guide or place were you like.
Open up pd-prints-03, copy and paste as new layer, resize @ 70% smartsize once
sharpen twice, I added a white gradient glow with eye candy 4000 again, this is optional,
add same drop shadow as before, place this behind all layers.
Open up pd-sparkle-01, copy and paste as new layer, resize 3 times @ 70% smartsize
sharpen twice, and place this layer on top, duplicate once and bring it over some then merge together,
I erased the parts that were on the face.
Open up your font of choice and add your name and any copyright info that belongs
Save as a png or jpg and your done!
Hope you enjoyed my tutorial :)


0 comments:
Post a Comment