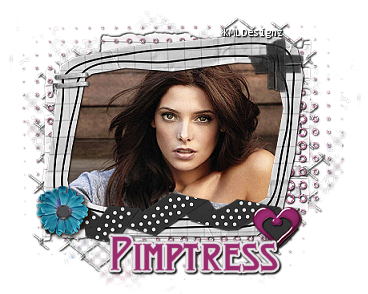
Ashley Girlz Rock Frame Tutorial
KMLDesignz
February 2nd 2011
Supplies Needed
Scrap Kit Of Choice
I am using Girlz Rock Collab
By Pimp'd Designz & Designs By Sarah
http://pimp-your-tags.blogspot.com/
Which you can buy here and here
One Graphic of choice
Font Of Choice, I am using AnacostiaNF
My supplies here
Any version of PSP
Let's Get Started
Open a new image 600*400 big enough to play around
we will resize later.
Open up Frame 3 in the kit
Copy and paste as new layer on your image, resize @ 50% smartsize once and sharpen once
click inside your frame with your magic wand, expand by 5
Open up your graphic of choice, copy and paste as a new layer and resize enough
so it looks nice in your frame, click invert, then delete, select none.
I sharpened my graphic twice.
Add a drop shadow to the frame
V&H-1
Opacity-100
Blur-2.00
Color-BLK
Time to decorate your tag :)
Open up the flower in the scrap kit, copy and paste as a new layer
resize this % 50% smartsize twice, and sharpen once, add the same drop shadow as before
I placed mine in the left bottom corner.
Open up the splash in the kit, copy and paste as a new layer
resize this at 50% smartsize once, sharpen once and add same drop shadow as before.
I placed this behind the tag, just enough so it peaks out. Use sample for guide.
Open up ribbon 4 in the kit, copy and paste as a new layer. resize @ 50% smartsize
once, sharpen once and add same drop shadow as before, I place this above the frame
and made sure the flower was above the ribbon, use sample as guide or place were you like.
Open up the staple in the kit, copy and paste as new layer, resize once @ 50% smartsize,
sharpen once, duplicate this once and merge down so its one layer. Place this in the
top left corner of the tag, use sample as guide. I added the same drop shadow as before.
Open up the ripped paper in the kit, copy and paste as a new layer
resize twice @ 75% smartsize, sharpen once, I place mine behind all layers
just enough so it peaks out, use sample as guide. add same drop shadow.
I then duplicated it once, mirrored and then flipped so it peaks out the other side.
Open up the tape in the kit, copy and paste as a new layer
resize this twice @ 50% smartsize, sharpen twice.
Place this in the top right corner of the tag, duplicate once
then rotate 90 degrees to the right, merge together these 2 layers.
Add the same drop shadow as before.
Open up the purple heart, copy and paste as a new layer
resize once @ 50% smartsize then once @ 75% smartsize
Sharpen once, same drop shadow as before, I placed this in the bottom right corner,
use sample as a guide or place were you want :)
Now with the supplies I provided
Open up the fence in the supplies, copy and paste as a new layer
resize this twice @ 75% smartsize, sharpen twice, add same drop shadow as before.
bring this below all the other layers, use sample as a guide, I made mine so it
peaks out some.
Open up the supply that says elements1, I used this as a mask,
open up paper 9 in the kit, apply the mask to the paper, then merge group
copy and paste the mask on your image, bring below all other layers.
I then used my deform tool and fit to the tag so it looks nicely behind the other
supplies, use my sample as a guide.
Merge layers visble, choose your font, add any copyright info. Save as a PNG or JPG
Your choice :)
Thanks for trying my tut, I hope you enjoyed it.


0 comments:
Post a Comment