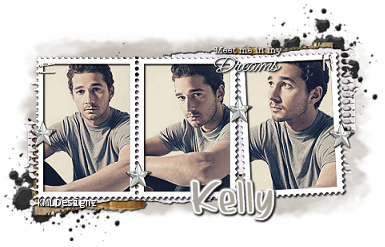
Border Scrap Tag Tutorial
By KMLDesignz
October 30th 2010
Supplies Needed
Graphic Of Choice
Font Of Choice
Plugins:
Eye Candy 4000
Filters Unlimted 2.0
Filter Factory J-Toners (Optional)
You can get those here
Rest of Supplies Here
Let's get started
open a new image 600*400, we will resize later
Open up scrap paper provided and copy and paste onto your new image
resize this @ 70 % smartsize 3 times, sharpen once, then take your deform tool
and take the sides in some and the top down a little
I colorized mine with filters unlimted to match my tag colors, you can do the same.
Open graphic of choice and copy and paste onto your new image
resize to your liking, use sample above for ideas
Make sure the graphic layer is above your scrap paper layer
Go back to the scrap paper layer, open up Eye Candy 400 and click on gradient glow
Click on the color tab and click fluorescent tubing one, I removed all the blue colors
and made the last blue one white, then go back to the basic tab and make the size 3.00
soft corners @ 25 and opacity @ 100 and the selection checked, fool around with the color
so it makes a nice border around the tag. repeat this once more with the same settings.
Then add a drop shadow to the scrap paper you just did the gradient glow to
H&V-1.00
Opacity-100
Blur- 2.00
Color-BLK
Do the same gradient glow steps to your graphic layer with the same drop shadow.
Time To Decorate The taggie :)
Take your supplies and open them up in PSP, Click on the notebook paper layer
Copy and paste this on to your new image, make sure its below your graphic layer but above
the scrap paper layer.
I resized mine @ 70% smartsize twice so it peaks out of the graphic just enough then sharpen once, duplicate
this and then mirror it to the other side so it peaks out a little as well.
Add the same drop shadow as before.
Open up the splat layer in the supplies, copy and paste onto the new image
resize @ 70% smartsize twice, and put this below the notebook paper layer, I colorized mine to match.
You can do the same if you want or keep it black.
I duplicated this and played with it so it peaks out a little on the right side of the tag
use sample above for postion.
Open up the star in the supplies and copy and paste onto the image, resize to your liking
I resized mine @ 70% three times and sharpened twice, added the same drop shadow as before.
I duplicated mine a few times and placed them on the tag like in sample, you can do this as well.
Open up the staples in the supplies, copy and paste onto the new image
I resized mine once @ 65% smartsize and sharpened twice then duplicated twice and merged them
together, then duplicated it once more and place this one in the top right of the tag, use sample
above to postion them :)
Last part, open the ribbon in the supplies, I colorized mine to match.
Resize this @ 65% smartsize 7 times, sharpen once, add same drop shadow as before.
I placed mine under the star layers so the stars are on the corners.
Open the scrap paper up again, colorize to match your tag, I resized it @ 65% smartsize twice
then I took the deform tool again and brought in the sides some and the top, make sure its still
bigger than your background one we did before.
Go to adjust and then blur and click on Gaussian Blur, make the settings @ 15.00
Stay on this same layer
Before adding the weave, close out the blur layer and merge everything else together then resize @ 85%
smartsize once then sharpen once. open the blur layer and resize it the same, no sharpen.
Then go to Eye Candy 4000 and click on weave with these settings
Ribbon Width- 3.00
Gap Width- 1.00
Shadow and Thread detail both @ 0
Thread Length @ 3.00
Color- White
Pick out your font and add your name and any copyright info and save as png or jpeg.
Hope you enjoyed my tut!!
Other samples of the tutorial


