Monday, January 10, 2011

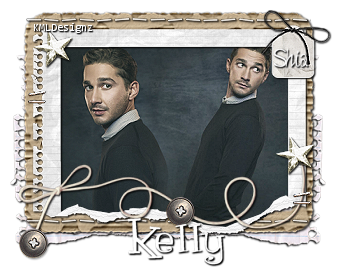
Torn Scraps Tutorial


Torn Scraps Tutorial
By KMLDesignz
January 10th 2011

Supplies Needed
2 Graphics of choice or 1 graphic
I used 2 and blended mine together, if you do this make sure they go together.
Font of choice, I used Grenouille
Any version of PSP
Factory J Plugin toners Here
Scrap Supplies here

Let's get started

Open up a new image 600*400 we will resize later
Open up your graphics of choice.

I used 2 pics and blended them together, if you used one that's fine.
Open up the torn frame in the supplies
copy and paste as a new layer, resize this by 60% smartsize one, then sharpen once.

use your magic wand and click inside the frame, expand by 5 and paste your
graphic of choice as a new layer, resize some so it looks nice in the frame
invert, then delete, select none, bring your graphic layer below the frame.
Add a drop shadow to the frame layer
V&H-1
Opacity-100
Blur-2.00
Color- Blk

Open up the cardboard frame in the supplies
Copy and paste as a new layer, I resized this @ 85% Smartsize twice till it
fit behind my frame, then I used the deform tool and brought it in some so it fits
nicely behind the frame as a background, use my sample as a guide.
I also resized my other frame so its not bigger than the cardboard piece, use
my sample as a guide.


Time to decorate.

Open up the stiches in the supplies, copy and paste as a new layer
Resize these @ 60% smartsize 3 times, I put this on the bottom of the
cardboard frame so it looks stapled, I erased the parts that hang off.
Sharpen twice, add the same drop shadow as before. duplicate it once and flip it
so its on the top of the cardboard piece. Use sample as guide.

Open up the ribbon in the supplies, copy and paste as a new layer
Resize this @ 60% smartsize 4 times, then once more @ 85% smartsize
Sharpen once and add the same drop shadow as before.

Open up the buttons in the supplies, I selected the metal one, choose which ever.
Copy and paste as a new layer resize @ 60% smartsize 5 times and sharpen twice
add the same drop shadow as before, duplicate once and place on the ribbon.
Use my sample as a guide to place them or place as you like.

Open up the star in the supplies, copy and paste as a new layer
resize this @ 60% smartsize 4 times and sharpen twice, use same drop shadow
place this on the top of the frame in the left corner, duplicate once and place
other one on the right side of the frame, use my sample as a guide.

Open up the tag in the supplies, copy and paste as a new layer.
Resize this @ 60% smartsize 3 times, sharpen once. add the same drop shadow.

Open up the staples in the supplies, copy and paste as a new layer
resize these @ 50% smartsize once and sharpen twice, duplicate it 3 times and
merge just the staples together, then place on the tag like in my sample or
were you like.

Open up the notebook paper, copy and paste as a new layer
resize this @ 70% smartsize once, sharpen once.
Bring this below all the other layers, add same drop shadow as before.
duplicate this one and mirror it, then merge these two layers together.

Choose your font, Merge all layers visble, Resize if you like, I kept mine as is.

Put your name and any copyright info on the tag, save as a png or jpeg which
ever you like, I like png cause they go on backgrounds better.

Your done!! I hope you enjoyed my tut, I love seeing samples you make :)

Thursday, January 6, 2011

Frame Tutorial


Frame Tag Tutorial

Supplies needed
4 Graphics of choice
Scrap supplies of choice or ones I supplied
Font of choice, I used Love Ya Like A Sister
Word Art Of Choice
Template
Supplies Here
Filter Factory J plugin-Toners Here (Optional)

Everything I used is supplied

Lets get started

Open up a new image 600*400

Open up your template, copy the frame and paste as new layer. I resized it By
60% smartsize once. Sharpen once

click inside your first frame with your magic wand, Expand by 5

Open up your graphics of choice and choose one you want to use first.

Depending on the graphics your using, resize to your liking.
after resizing, I sharpened mine at least twice, invert, then delete and bring
this below the frame layer.

Repeat these steps for your other 3 frames with the other graphics.

Add drop shadow to frame
V&H-1
Opacity-100
Color-blk
Blur- 2.00

I then used my factory J plugin and picked toners with these settings and added it
to all my pics to give it a soft look.
Red- 7
Green- 14
Blue- 18
I did mine twice, use to your liking :)

Time to decorate your tag :)

Open up paper1 and paper2 in the supplies, copy paper1 and paste as a new layer
resize this @ 70% smartsize once, then sharpen once and add same drop shadow as before
copy paper2 and do the same, I put this one on top of paper1 and put them in the
left corner of the tag, use example above for placement or place were you like.

Open up the staple in the supplies, copy and paste as a new layer, I resized this
@ 70% smartsize once then sharpened once and gave it the same drop shadow, place
this over the papers we just put on the tag so it looks like its holding them.

Open up the background paper and copy and paste as a new layer
resize this @ 70% smartsize twice, sharpen once, bring this below all layers
Give it the same drop shadow as before once.

Open up the glitter in the supplies, copy and paste as a new layer
I resized this one @ 70% smartsize twice and sharpened twice
I put this above the background paper we just did, and adjusted it so its
peeking out a little,look at example for an idea, add the same drop
shadow as before, duplicate this once then flip it once
and it will peek out on the bottom as well.

Open up the fence in the supplies (its labeled scrap challenge)
copy and paste this as a new layer, resize twice @ 70% smartsize and sharpen 3 times.

I brought this above the glitter, gave it the same drop shadow as before.
Adjust it some so its peeking out a little on the top and sides, duplicate once
and flip then mirror, make it peek out a little on the bottom as well, use example for guide.

Open up the star in the supplies, copy and paste as a new layer, resize this
@ 70% smartsize 10 times, sharpen twice and use same drop shadow as before
I then duplicated it once and put them both on the right side, top and bottom.

Open up the wordart in the supplies, copy and paste as a new layer
resize this @ 70% smartsize 4 times and place in bottom left corner
sharpen twice and add same drop shadow as before, this is optional you can
always add whatever you want to make the tag your own, be creative :)

Merge all layers visible, resize @ 70% smartsize or whatever size you want and sharpen once.
choose your font and put your name on it and
any copyright info that goes on, save as a png and your done!

I hope you enjoyed my new tutorial, I would love to see examples :)