Monday, October 3, 2011

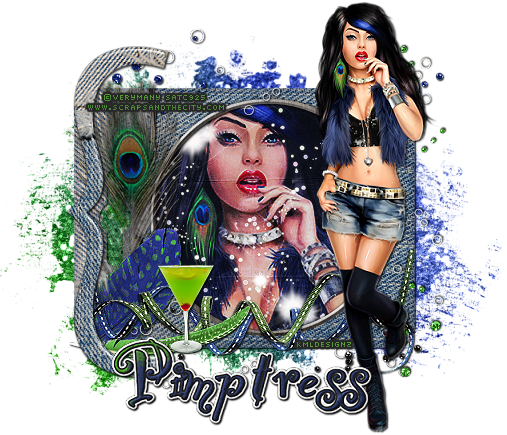
VIP Party Goer Tutorial


VIP Party Goer Tutorial
October 2nd 2011
BY: KMLDesignz

Supplies Needed:
Any PSP version will work, I am using PSP 9
Tube of choice, I am using the AWESOME artwork by Verymany
This is a SATC exclusive tube and you need a license to use it, you can purchase @ SATC here
Scrap kit of choice, I am using the awesome Party Goer Collab by Pimpd Designz and Designs By Sarah @PMTWS
http://pimpmytagswithscraps.com/blog/
 You can purchase this here and here
Eye Candy 4000 Gradient Glow (optional)
Font of choice, I am using Party

Let’s Get Started:
Open up PSP and your supplies, minimize them for now, Open up a new image 700*500, we can resize or crop later if needed.

From your kit, Open up a frame of choice, I am using frame 3 from Sarah’s part, C/P as new layer, resize, I then rotated it 90 degrees to the left, then flip it, resize this @ 60% smartsize once, sharpen twice.

Click inside your frame, expand by 5 and pick out a paper of choice, I am using paper 11 from Sarah’s part of the kit, C/P as new layer, resize this @ 70% smartsize 3 times and sharpen twice, click invert, delete, invert again and then select none. Bring this below the frame layer.

Now with your tube, take the close up of your tube if you have one, if not just use a close up of it without resizing. I had a close up part so I resized mine @ 80% smartsize once and sharpened once. Bring this below the frame layer and above the paper layer, I erased any that hung over the frame. I then took the blend mode and changed it to Hardlight and lowered the opacity to 80%. Add a drop shadow to your tube layer, V&H-1 Opacity-100 Blur-2 Color-BLK.

Now take your full size tube, C/P as new layer, resize this one nicely and fit it nicely on your tag were it looks best. Make sure you sharpen it to look nice and add same drop shadow.

Let’s Decorate Your Taggie:

Sarah's Part of The Kit (Designs By Sarah)

Open up a bracket of choice, I am using the one in Sarah’s part, C/P as new layer, resize this @ 80% smartsize 3 times, sharpen twice and add same drop shadow as before, I mirrored mine and placed on the left side of the tag some.

Open up 2 ribbons of choice, I am using ribbon 7 and 8 from Sarah’s part, C/P one of them first, resize this @ 70% smartsize twice, sharpen twice, and add same drop shadow as before, place near the bottom of the taggie, make sure it’s behind the bracket layer, repeat for the 2nd ribbon but mirror this one after you’re done.

Open up a glitter splat of choice, I am using glitter 1 from Sarah’s part, C/P as new layer, Resize this @ 80% smartsize once, then duplicate and resize again @ 80% smartsize, sharpen both of them twice, place behind all layers, make sure your duplicated one peaks out on the top more.

Open up a feather of choice, I am using the peacock feather from Sarah’s part, C/P as new layer, resize this one @ 80% smartsize 3 times and sharpen twice, same drop shadow as before, I placed this on top of my frame on the left side. Under the bracket layer.

Open up a glitter type spill element, I used 3 of them from Sarah’s part. C/P one of them for now, resize this @ 80% smartsize twice, sharpen twice and place on the bottom of the tag above all layers but the bracket and tube layer. Same drop shadow as before. Repeat this for the remaining two but place one on the top and then flip one and place on the right side of the tag behind the tube layer. You can use the sample as a guide, they are the blue, green and black things with white circles.

Now for Cora’s part of the kit (Pimpd Designz)

Open up 2 more feathers of choice, I am using 2 from Cora’s part, C/P one of them, I am using the blue one first, Resize this @ 80% smartsize twice and sharpen twice, same drop shadow as before, placed this over the peacock feather (or whichever one you used) some so it looks layered. C/P your other feather, this is the green one for me from the kit, resize this one @ 40% smartsize once and then once @ 70% smartsize, sharpen twice, same drop shadow as before. Place this one at the bottom of both the feathers so it looks as if it’s laying there.

Open up a Martini glass, I am using the one in Cora’s part of the kit, C/P as new layer, resize this one @ 40% smartsize twice and sharpen twice, same drop shadow as before. Place this nicely above your feather and ribbon layers.

Open up a sparkle cluster of choice, I am using the sparkle in Cora’s part, C/P as new layer, resize this @ 40% smartsize once, sharpen and no drop shadow, I placed mine over the tube layer we put in the frame. Erase any that covers the face of the tube too much.

Open up your font of choice, add your name and any gradient glow if wanted, also any copyright info that belongs on the tag and save as png or jpg and your done with the tutorial.
Thank you for trying my new tutorial, hope you liked it!!

Queen For The Day Tutorial

 
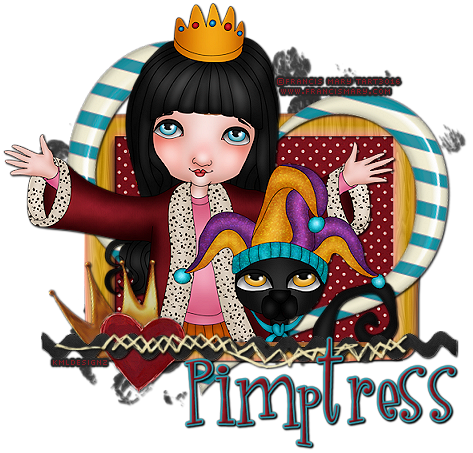
Queen For The Day Tutorial

October 2nd 2011

By: KMLDesignz

Supplies Needed:

Any version of PSP will work. I am using PSP 9

Tube of choice, I am using the artwork by Francis Mary @ MTA
www.francismary.com

This is PTU and you need a license to use it, you can purchase here

Scrap kit of choice, I am using the adorable Queen For The Day by Pimpd Designz @ PMTWS

http://pimp-your-tags.blogspot.com/

This is PTU and you can purchase this here and here

Eye Candy 4000 Gradient Glow (Optional)

Font of choice, I am using Randumhouse


Let’s Get Started

Open up your supplies and psp, minimize the supplies for now, open a new image 700*500, we will resize/crop out later if needed.


Open up a frame of choice, I am using frame 3 from the kit I am using, C/P as new layer, resize this once @ 65% smartsize and sharpen twice, click inside with your magic wand, expand by 5 and then pick out your paper of choice, I am using paper 12 from the kit I have, C/P and resize this 3 times @ 80% smartsize, sharpen twice and then click invert, delete and then invert again, and select none.

Bring your paper layer below the frame and give your frame layer a drop shadow, V&H-1 Opacity- 100 Blur-2 Color-BLK


Open up your tube of choice, C/P as new layer, depending the size and which tube you’re using, resize nicely to fit into the tag, I did mine once @ 70% smartsize and sharpened once. Add the same drop shadow as before, bring this below your frame layer, duplicate your frame layer bring one below the tube and one above the tube, the one above the tube, erase any that covers the tube is shouldn’t.


Let’s Decorate The Taggie!

Open up a crown of choice, I am using the one in the kit I have, C/P as new layer, resize this one @ 80% smartsize 6 times and then rotate 15 degrees to the left, sharpen three times and same drop shadow as before to it, I placed this on the left side of the tag above all layers, on the bottom part.

Open up a heart of choice, I am using heart 1 from the kit I have, C/P as new layer, resize this one @ 80% smartsize 6 times and sharpen three times, same drop shadow as before, I placed this over the crown we just did a little.


Open up a ribbon of choice, I am using ribbon 6 from the kit I have, C/P as new layer, resize this one twice @ 80% smartsize sharpen twice and same drop shadow as before, place this on the bottom of the tag, above all layers.


Open up a stitch of choice, I am using the one in the kit, C/P as new layer, resize this one @ 80% smartsize once and then again @ 85% smartsize and sharpen twice, same drop shadow and place this above the ribbon we just did some.


Open up a heart shaped frame of choice, I am using the one in the kit I am using, C/P as new layer, resize this one @ 80% smartsize twice, sharpen twice and same drop shadow as before, rotate 15 degrees to the right. I placed this behind the tube layer.


Open up a print of choice, I am using print 2 from the kit, (This is like a splat of something) C/P as new layer, resize this @ 80% smartsize once, sharpen once, duplicate and place these both so they peak out some on the top and bottom of the tag, behind ALL layers, same drop shadow as before.


Open up your font of choice, add your name and any gradient glow you choose or leave as is, then any copyright info that belongs. Save as a png or jpg and you’re done.
I hope you enjoyed my new tutorial, thanks for trying it!

Thursday, September 29, 2011

Spellbound Witch Tutorial


Spellbound Witch Tutorial
Supplies Needed:
PSP, Any version should work, I am using 9
Tube of choice, I am using the awesome artwork of Elias Chatzoudis
www.Elias-design.gr
This is a PTU tube and you need a license to use it, you can purchase that @ PTE Here
Scrap kit of choice, I am using the awesome kit by Pimpd Designz @ PMTWS
http://pimp-your-tags.blogspot.com/
This is PTU and you can purchase that here and here
Eye Candy 4000 Gradient Glow (Optional)
Font of choice, I am using MagicSpellJF

Let’s Get Started:

Open up PSP and open up your supplies, minimize them for now.

Open up a new image 700*500, we can resize/crop later if needed.

Open up a frame of choice from your kit, I am using frame 3 from the kit I am using, C/P as new layer, resize this @ 65% smartsize once and sharpen twice.

Click inside your frame, depending how many open spots you have, make sure you click in all, expand by 5.
Open up a paper of choice from your kit, I am using paper 3 from the kit I am using, C/P as new layer, resize twice @ 70% smartsize and then once @ 90% smartsize, sharpen twice, invert and delete the rest that hangs over the frame, bring below the frame layer.

Open up your tube of choice, I took parts of my tube and placed them inside the frame, a close up of the face works good then another part. C/P and a new layer and do so, make sure to resize nicely depending which parts you’re using, sharpen at least twice. Erase any that hangs over the frame, and bring below the frame layer, but ABOVE your paper layer. Add a drop shadow to your tube layers, V&H-1 Opacity-100 Blur-2 Color-BLK. Then add the same drop shadow to your frame layer. 

I changed the blend mode to the tube layers, for the close up of the face on mine which also includes her back side, I changed this one to overlay, my other one I changed to Luminance (Legacy).

Take your tube again, the full size one, C/P as new layer, resize once @ 65% smartsize once, and sharpen once, place nicely on top of all layers on your frame nicely. Add same drop shadow as before.

Let’s Decorate The Taggie:

Open up a bottle of choice, I am using bottle 1 and 3 from the kit I am using. C/P as a new layer for one of them, I am doing bottle 1 first, I resized this @ 80% smartsize 3 times and sharpened twice, add same drop shadow, I placed this on the bottom of the taggie on the right side. C/P the other bottle if using one, resize this one @ 85% smartsize 7 times, and sharpen three times, same drop shadow and place this next to the other one, use sample as guide.

Open up some bubbles of choice, I am using the ones from the kit I am using, C/P as new layer, resize this one @ 80% smartsize twice, mirror and then place on the right side of the tag, sharpen twice, place this layer between the bottle layers. Same drop shadow as before.

Open up a broom of choice, I am using the one in the kit I have, C/P as new layer, resize this @ 80% smartsize once then once @ 90% smartsize, sharpen twice, and add same drop shadow as before, place this on the left side of the tag, behind your main tube layer but above all other layers.

Open up a ribbon of choice, I am using ribbon 5 from the kit I have, C/P as new layer, resize this one @ 80% smartsize 4 times and sharpen 3 times, same drop shadow, I placed this over the broom some, on the left side.

Open up a spider web of choice, I am using the one from the kit I have, C/P as new layer, resize this once @ 80% smartsize, sharpen twice, same drop shadow as before, I placed this behind the main tube but above the frame layer, so it should behind all layers but the frame one, so it looks attached to the frame.

Open up a spider of choice, I am using the one in the kit I am using, C/P as new layer, resize this one @ 80% smartsize 7 times, sharpen 3 times, same drop shadow as before, I placed this in the middle of the tag, on top, so it looks like it’s going to go down on the web.

Open up a word art of choice, I am using word art 4 from the kit I have, C/P as new layer, resize this one @ 80% smartsize 4 times and rotate 15 degrees to the right, sharpen 3 times and add same drop shadow as before, I placed this one on the right side of the tag on the left of the tag, above all layers.

Open up a wand of choice, I am using the one in the kit I am using, C/P as new layer, rotate 90 degrees to the right, then resize this @ 80% smartsize 4 times and sharpen 3 times, place behind the main tube layer, make sure it’s above the bottle layers too.

Open up some stars of choice, I am using stars 2 from the kit I have, it’s a cluster form of them, C/P as new layer, resize this one once @ 80% smartsize, sharpen twice and place behind all layers, same drop shadow.

Open your font of choice add your name and any copyright info that belongs, and save as a png or jpg and you’re done!

Thanks for trying my new tutorial, hope you enjoyed it!

Wednesday, September 28, 2011

Gothic Glamour Vamptress Tutorial


Gothic Glamour Vamptress Tutorial

September 28th 2011

By: KMLDesignz


Supplies Needed:

Tube of choice, I am using the artwork by Keith Garvey

www.garvgraphx.com

This is a PTU tube and you can buy this one @ PTE here

Scrap kit of choice, I am using the awesome kit Goth Glam by Pimpd Designz @ PMTWS

http://pimp-your-tags.blogspot.com/

You can purchase this kit here and here

Any PSP version will do

Eye Candy 4000 Gradient Glow (Optional)

Font of choice, I am using Vampiress


Let’s Get Started


Open up PSP and open up your supplies your using, minimize them for now.


Open up a new image 700*500, we will resize it later if needed.


Open up a frame of choice, I am using frame 5 from my kit, C/P as a new image, resize this @ 70% smartsize once and then once @ 80% smartsize, sharpen twice.


Click inside your frame, expand by 5, Open up a paper of choice, I am using paper 6 from my kit, C/P as new layer and resize 4 times @ 80% smartsize, sharpen twice, invert and delete the rest that hangs over, invert again and then select none, bring this below your frame layer, Add a drop shadow to your frame layer, V&H-1 Opacity-100 Blur-2 Color-BLK


Open up your tube of choice, preferably a close up for this part, take the close up and C/P as new layer, resize twice @ 80% smartsize and sharpen twice, bring below the frame layer but ABOVE the paper layer, erase any that hangs over the frame, I changed the blend mode to Hardlight, then take your close up again and C/P as a new layer again, repeat but then change this blend mode to softlight and duplicate twice, DO NOT merge.


Now take your full length tube, if you have one and C/P as a new layer, resize nicely to fit and sharpen at least twice, add the same drop shadow as before.


Let’s Decorate The Taggie!


Open up a glitter splat of choice, I am using print 3 from the kit I am using. C/P as a new layer, resize twice @ 80% smartsize, sharpen twice, I duplicated this once and mirrored, Use sample as guide. Add same drop shadow to them.


Open up a flower of choice, I am using flower 6 from the kit I am using, C/P as a new layer, resize this @ 80% smartsize 5 times and sharpen twice and add same drop shadow as before, I placed this one on the top of the tag on the left side.


Open up a staff of choice (stick or cane) I am using the one in the kit I am using, C/P as new layer, resize this one @ 80% smartsize  4 times and sharpen twice, same drop shadow as before, I placed on the right side of the tag, above all layers.


Open up a ribbon of choice, I am using ribbon 1 from the kit I am using, C/P as new layer, resize this @ 80% smartsize 5 times and sharpen 3 times, same drop shadow as before, I placed this over the staff (stick) I used on the bottom of it on the right side of the tag.


Open up a cross of choice, I am using the one in the kit I am using, resize this 5 times @ 80% smartsize and then rotate 15 degrees to the left and sharpen 3 times, same drop shadow as before, I placed this one on the left side of the tag.


Open up a gravestone of choice, I am using the one in the kit I am using, C/P as new layer, resize this 4 times @ 80% smartsize, sharpen twice, same drop shadow as before, I placed this below the cross we just did, and placed the cross some more around this.


Open up a spider web of choice, I am using the one in the kit I am using, C/P as new layer, resize this 5 times @ 80% smartsize, sharpen three times, same drop shadow as before, place this above the gravestone but below the cross, use sample as guide.


Open up a spider of choice, I am using the one in the kit I am using, C/P as new layer, resize once @ 40% smartsize and then once @ 70% smartsize, sharpen three times, same drop shadow and place this above the cross layer on the web some.


Open up some bats of choice, I am using the one in the kit I am using, resize this @ 80% smartsize 3 times and sharpen twice, same drop shadow as before, I placed these on the left side of the tag, above the gravestone but below the spider web. Erase any that cover the tube’s face.


Open up a moon of choice, I am using the one in the kit, C/P as new layer, resize twice @ 80% smartsize, sharpen twice and same drop shadow as before, place behind all layers, but above the red splats, I then took the bats, duplicated and flipped once, and resize once @ 80% smartsize again, sharpen again and place around the moon some.


Open up your font of choice, add your name and any copyright info that belongs and save as a png or jpg and you’re done!


Thank you for trying my tutorial, I hope you enjoyed it!

Saturday, September 24, 2011

Mz Pumpkinella Tutorial


Mz Pumpkinella Tutorial

September 23rd 2011
By: KMLDesignz

Supplies Needed:
Any PSP version will work with knowledge of knowing your way around them.
Tube of choice, I am using the awesome artwork of Elias Chatzoudis
www.elias-design.gr
You need a license to use it which you can get @ PTE here
Scrapkit of choice, I am using a PTU kit by Sarah’s Designs called Mz Pumpkin @ PMTWS
http://www.pmtws-designsbysarah.blogspot.com/

You can purchase that here and here.
Font of choice, I am using PinkFlamingo
Eye Candy 4000 Gradient Glow (optional)

Let’s Get Started:
Open up your supplies and minimize for now.
Open a new image 700*500, we will resize/crop later if needed.
From your scrapkit your using, pick out a frame, I am using frame 3 from mine, C/P as new layer and resize this once @ 80% smartsize and sharpen once.

Open up a paper of choice from your kit, I am using paper 6, 7 and 8 from mine since my frame has 3 squares, resize each of these @ 80% smartsize 3 times and sharpen twice. Bring them below the frame layer.
Open up your tube back up and for this part, I selected different parts of the tube, a close up of the face for one and 2 other parts for the other 2 frame squares, erase any that hangs outside the frame and bring these below the frame layer but above the paper layers.

I changed the blend mode to each tube layer to give it a little pop.
The face close up, I changed to Exclusion, the back close up to Hardlight and the front close up to Overlay. Add a drop shadow to your frame layer, V&H-1 Opacity-100 Blur-2 Color-BLK.
Add the same drop shadow to each tube layer as well.

Take your tube again and copy and paste, resize nicely to fit into the tag and place between the frames, same drop shadow as before.

Let’s Decorate The Taggie:

Open up a glitter splat of choice, I am using the glitter splat 1 and 2 from my kit, C/P as a new layer, resize the first one @ 80% smartsize once and sharpen twice, then resize the 2nd one @ 80% smartsize once then again @ 85% smartsize and sharpen twice. Place these both nicely behind all layers.

Take another glitter splat C/P as a new layer and resize it @ 85% smartsize and sharpen once, place behind the other 2.

Open up a spider with a web of choice, I am using the one from the kit, C/P as a new layer,  resize @ 70% smartsize three times  and sharpen twice, I added a gradient glow of white to mine then added the same drop shadow as before. I placed this on the right side of the taggie below the tube layer.

Open up a ribbon with charm of choice, I am using Ribbon 1 from the kit, resize twice @ 70% smartsize and sharpen twice, I mirrored mine and placed it on the left bottom part of the tag above all layers but below the tube layer. Same drop shadow as before.

Open up a candy of choice, I am using 1 and 2 from my kit, C/P as new layer, I resized both of these @ 70% smartsize five times and sharpened twice, I merged together and placed on the top right of the taggie on the frame corner. Same drop shadow as before.

Open up a button of choice, I am using button 3 from my kit I am using, C/P as new layer and resize 5 times @ 70% smartsize and sharpen twice, same drop shadow and place nicely around the taggie, I duplicated twice to have 3 around the tag.

Open up your font of choice and add your name, I added a gradient glow to mine, this is optional.  Add any copyright info that belongs and save as a png or jpg and you’re done.
Hope you enjoyed my new tutorial, thanks for trying it out!